

Deploying a Springboot Api on Aws Ec2
Build and deploy a backend API with Spring boot and Mysql on Aws Ec2 instance and s3.


Table of contents
Introduction
This article is written to help you understand how you can easily deploy a backend API on the cloud. It is assumed that you have a fair understanding of writing spring boot applications with data persistence using a database service of choice. In this article, we will be using Mysql. We will be deploying our Api using the elastic compute cloud (EC2) service provided by Amazon web service (Aws) cloud provider. Setting up a root user account and IAM users with permissions is easily done in Aws. The Aws documentation provides detailed step by step on creating user accounts.
Setting up a root user
https://docs.aws.amazon.com/accounts/latest/reference/manage-acct-creating.html
Setting up an IAM user
https://docs.aws.amazon.com/IAM/latest/UserGuide/id_users_create.html
Springboot Api
This is a basic CRUD project for a student management system. With this Api, we can view a list of all students, create a student, update a student record and delete a student record.
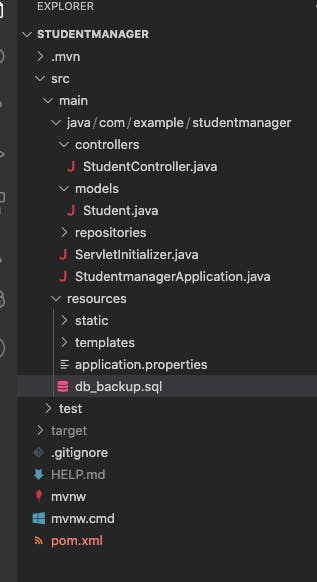
This would be our starter project file structure
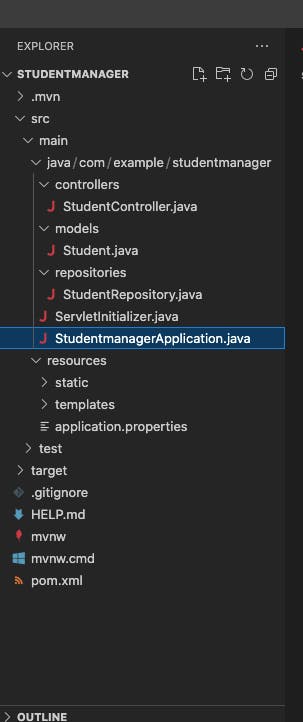
The controllers folder holds the REST Api code, the student object description goes into the models folder. This is also where we can define the columns needed for the database table. The repositories folder holds the methods and queries for performing database operations for each model object.
The application.properties file contains the configuration for connecting to the database, application port db username and other custom configurations. Keep in mind that this configuration would change when we are ready to deploy the project to Aws.
server.port=8080
#DataSource Configuration
spring.datasource.driver-class-name=com.mysql.cj.jdbc.Driver
spring.datasource.url=jdbc:mysql://localhost:3306/studentmanager
spring.datasource.username=admin
spring.datasource.password=password280
#Hibernate Configuration
spring.jpa.hibernate.ddl-auto=none
spring.jpa.show-sql=true
student.java
package com.example.studentmanager.models;


import jakarta.persistence.Entity;
import jakarta.persistence.Id;
import jakarta.persistence.Table;
import jakarta.persistence.Column;

@Entity
@Table(name="students")
public class Student{

    @Id
    @Column(name="id")
    private int id;
    @Column(name="studentnumber")
    private String studentNumber;
    @Column(name="fullname")
    private String fullName;
    @Column(name="department")
    private String department;


    public Student() {
    }


    public Student(String studentNumber, String fullName, String department) {
        this.studentNumber = studentNumber;
        this.fullName = fullName;
        this.department = department;
    }
    public Student(int id, String fullName, String department) {
        this.id = id;
        this.fullName = fullName;
        this.department = department;
    }

    public Student(int id, String studentNumber, String fullName, String department) {
        this.id = id;
        this.studentNumber = studentNumber;
        this.fullName = fullName;
        this.department = department;
    }

    public int getId() {
        return this.id;
    }

    public void setId(int id) {
        this.id = id;
    }

    public String getStudentNumber() {
        return this.studentNumber;
    }

    public void setStudentNumber(String studentNumber) {
        this.studentNumber = studentNumber;
    }

    public String getFullName() {
        return this.fullName;
    }

    public void setFullName(String fullName) {
        this.fullName = fullName;
    }

    public String getDepartment() {
        return this.department;
    }

    public void setDepartment(String department) {
        this.department = department;
    }

    public Student id(int id) {
        setId(id);
        return this;
    }

    public Student studentNumber(String studentNumber) {
        setStudentNumber(studentNumber);
        return this;
    }

    public Student fullName(String fullName) {
        setFullName(fullName);
        return this;
    }

    public Student department(String department) {
        setDepartment(department);
        return this;
    }

}
Studentrepository.java
package com.example.studentmanager.repositories;


import org.springframework.data.jpa.repository.JpaRepository;

import com.example.studentmanager.models.Student;


public interface StudentRepository extends JpaRepository<Student, Integer>{
    Student findByStudentNumber(String studentNumber);
}
studentcontroller.java
package com.example.studentmanager.controllers;

import org.springframework.beans.factory.annotation.Autowired;
import org.springframework.http.ResponseEntity;
import org.springframework.web.bind.annotation.DeleteMapping;
import org.springframework.web.bind.annotation.GetMapping;
import org.springframework.web.bind.annotation.PathVariable;
import org.springframework.web.bind.annotation.PostMapping;
import org.springframework.web.bind.annotation.RequestBody;
import org.springframework.web.bind.annotation.RequestMapping;
import org.springframework.web.bind.annotation.RestController;

import com.example.studentmanager.models.Student;
import com.example.studentmanager.repositories.StudentRepository;

@RestController
@RequestMapping("/student")
public class StudentController {

    @Autowired
    private StudentRepository studentRepository;

//read
@GetMapping("/all")
public Iterable<Student> getAllStudents(){
    return studentRepository.findAll();
}
//create
@PostMapping("/add")
public ResponseEntity<?> addStudent(@RequestBody Student student ) throws Exception{
    var fullname= student.getFullName();
    var department=student.getDepartment();
    var studentNumber=student.getStudentNumber();
    //check for empty field
    if(fullname.isBlank() || department.isBlank() || studentNumber.isBlank()){
        return ResponseEntity.status(401).body("All fields are required..");
    }
    //checking the db to see if the student number value already exist
    var numberExists=studentRepository.findByStudentNumber(studentNumber);
    if (numberExists!=null){
        return ResponseEntity.status(401).body("Student number already created....");
    }
    //go ahead and save the data in db if all checks passed
    Student saveStudent = new Student(studentNumber,fullname,department);
    saveStudent  = studentRepository.save(saveStudent);
    return ResponseEntity.status(200).body("Student addedd successfully...");
}


//update
@PostMapping("/update/{studentnumber}")
public ResponseEntity<?> updateStudent(@PathVariable("studentnumber") String studentNumber,
@RequestBody Student student) throws Exception{
    //query the db for the student number
    var studentToUpdate= studentRepository.findByStudentNumber(studentNumber);
    if(studentToUpdate==null){
        return ResponseEntity.status(401).body("Student not found");
    }
    //tenary operator to check if the requested field is empty
    //if empty, we will use the old value in the db
    var fullName=student.getFullName().isBlank()?studentToUpdate.getFullName():student.getFullName();
    var department=student.getDepartment().isBlank()?studentToUpdate.getDepartment():student.getDepartment();

    //save the data
    Student studentObject=new Student(studentToUpdate.getId(),studentToUpdate.getStudentNumber(), fullName,department);
    studentObject=studentRepository.save(studentObject);
    return ResponseEntity.status(200).body(studentObject);
}

//delete
@DeleteMapping("/delete/{studentnumber}")
public void deleteStudent(@PathVariable("studentnumber") String studentNumber){
    var student= studentRepository.findByStudentNumber(studentNumber);
    studentRepository.delete(student);
}

}
AWS EC2
Let's look at a high-level overview of how the Ec2 instance will be set up. In simple terms, an Ec2 instance is a virtual machine. A virtual machine is a software emulation of a physical computer system. An instance includes both a public and private ip address. We can use this address to interact with the instance depending on the allowed security group rules. A security group acts as a virtual firewall that controls inbound and outbound traffic for resources, such as virtual machines or instances, within a specific network or subnet.
Our spring boot application has two components:
The Application code and application database (Mysql).
The user only has to interact with the application code to get a response from the database. With this setup, the security group rules for both components will be different. The main difference is, we want to allow inbound traffic from the internet for the application code server and disallow inbound traffic from the internet for the database server.
Therefore, We will be setting up two Ec2 instances. One hosts the application code to which the user can make calls over the internet and the other hosts the database which blocks access to calls made over the internet. it only interacts with the instance hosting our application code.
Login to your Aws console with your IAM user account.
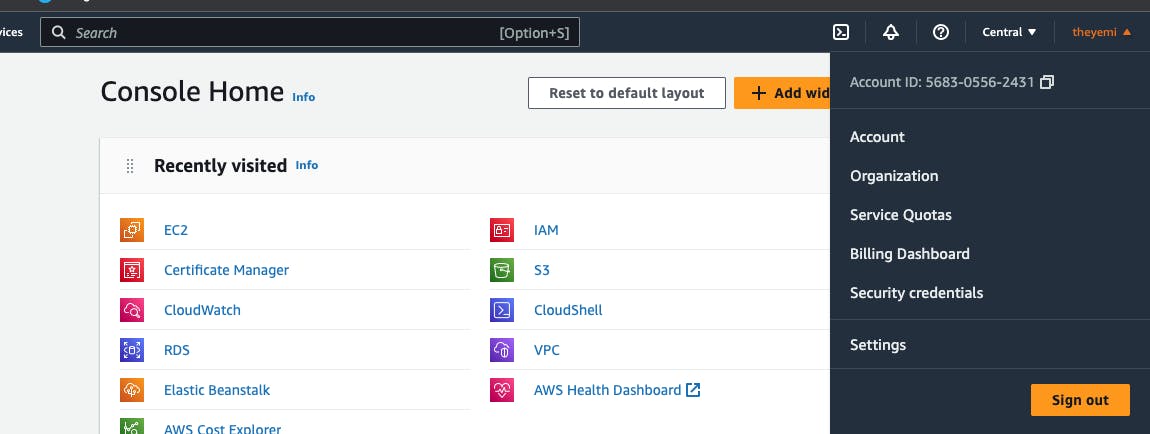
To locate your account id, log in to your root user account and click on the dropdown with your username in the top right corner of the console.
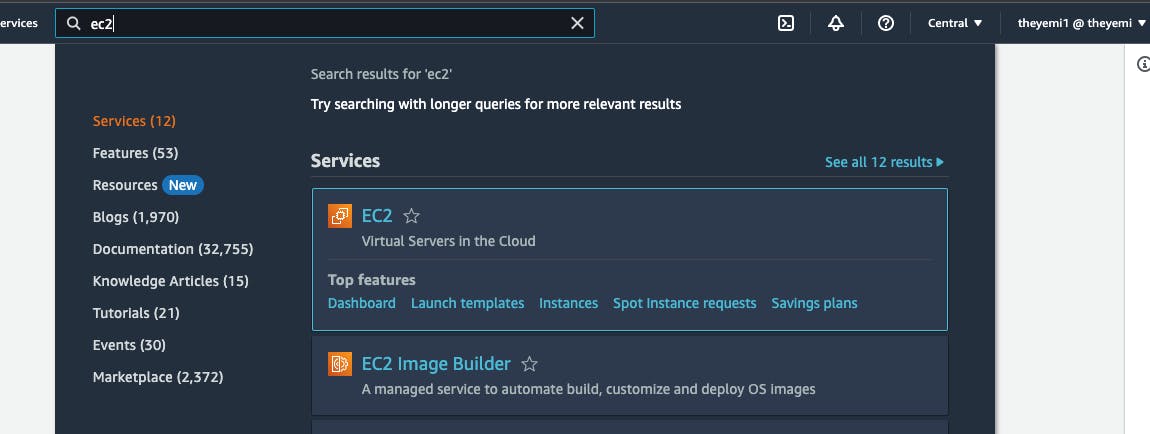
In your IAM user account console dashboard, search Ec2 in the search box
To create the security groups,
click on Ec2, scroll down on the left-hand panel, Network & security - Security Groups ---> create security group
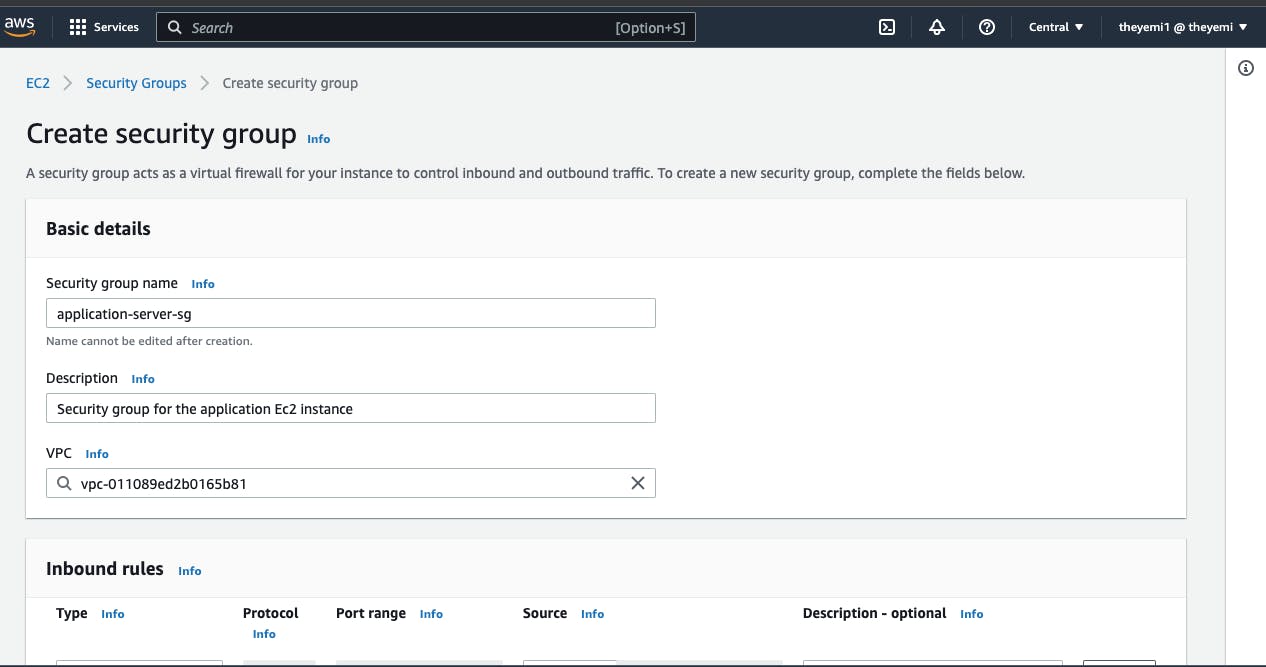
You can name your security group as you see fit. Make sure it gives a clear description of what it's used for.
Scroll down and click add inbound rule
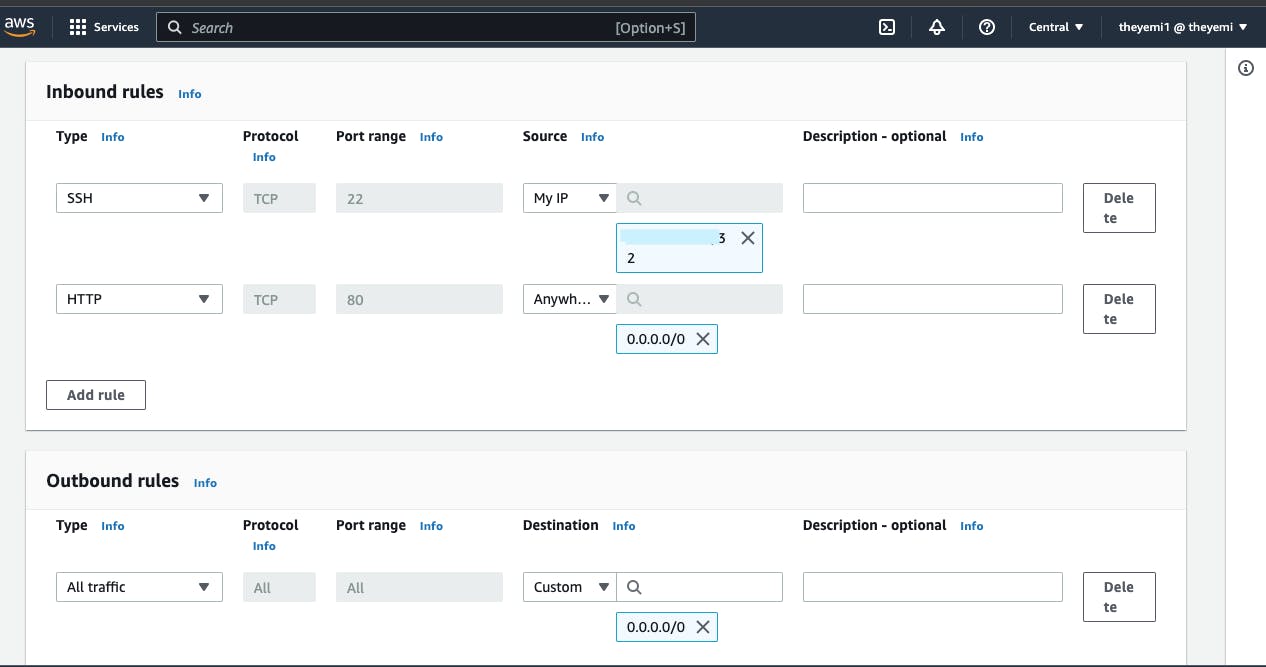
We are setting the security group to allow SSH (secure shell) access to our Ec2 instance. This access is only restricted to my computer's ip address. You can set it to be accessible from anywhere. We will be needing this to run some commands in our Ec2 instance which we will be seeing in a minute. Also, take note of the HTTP protocol which allows access to our Ec2 instance from anywhere on the internet. Scroll down and click on "create security group".
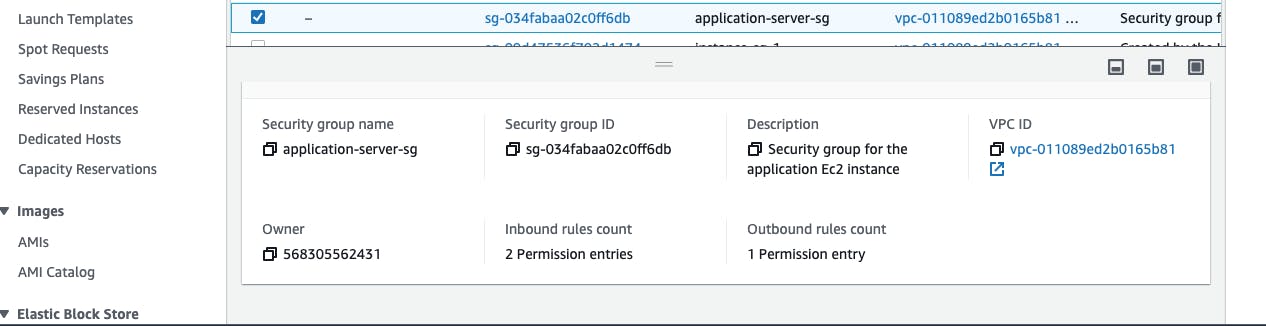
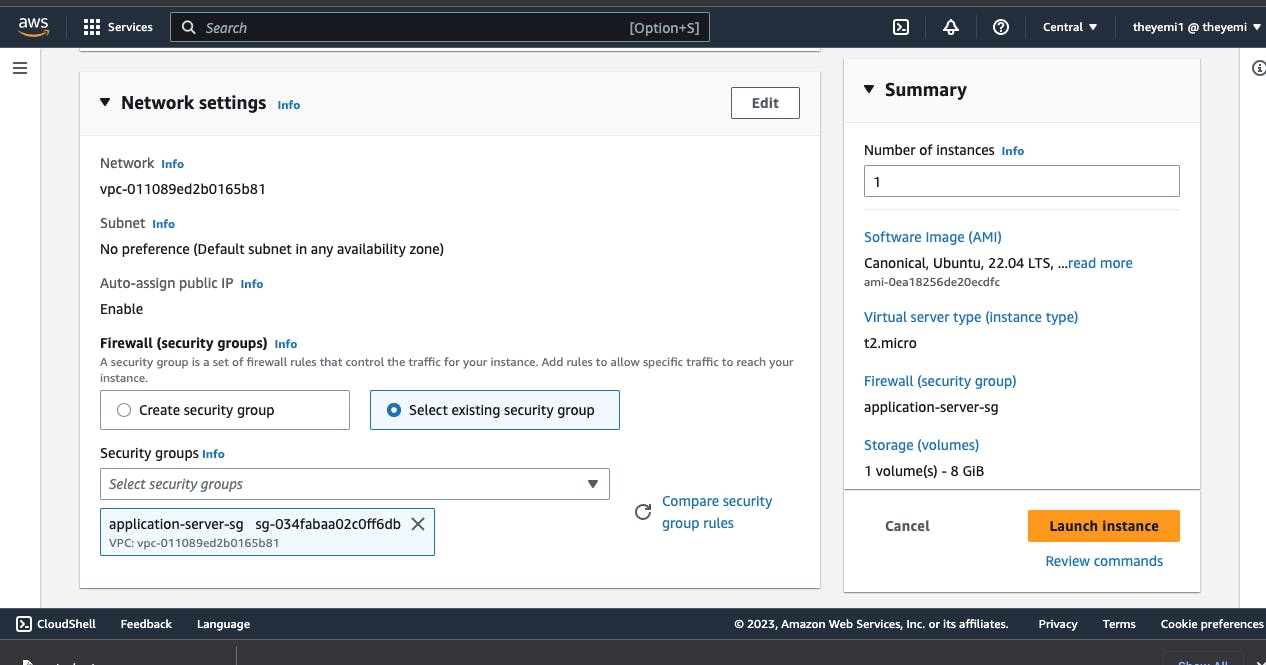
Take note of the security group's ID as we will be making a reference to it in the database instance security group. Remember we want the database Ec2 instance to be hidden away from the user and only accessible to the application Ec2 instance
For the database instance security group
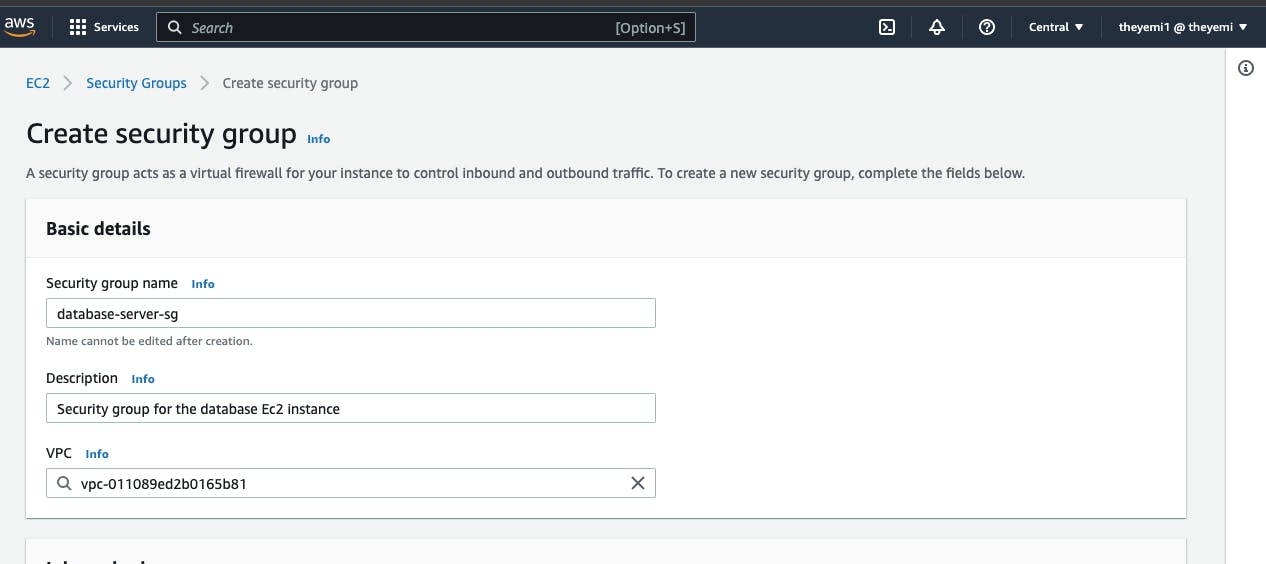

We are allowing Mysql database access from the application server's security group. This means that any Ec2 instance associated with the application server security group will be able to access the database Ec2 instance. When you are done, scroll down and save the security group
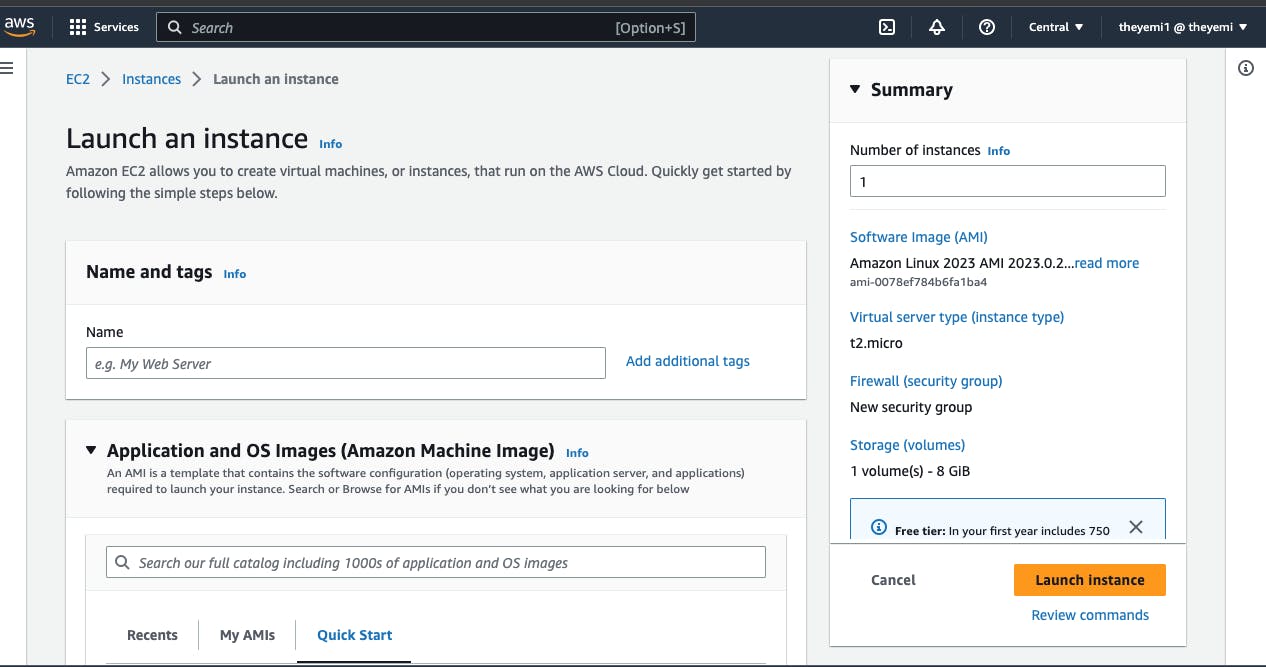
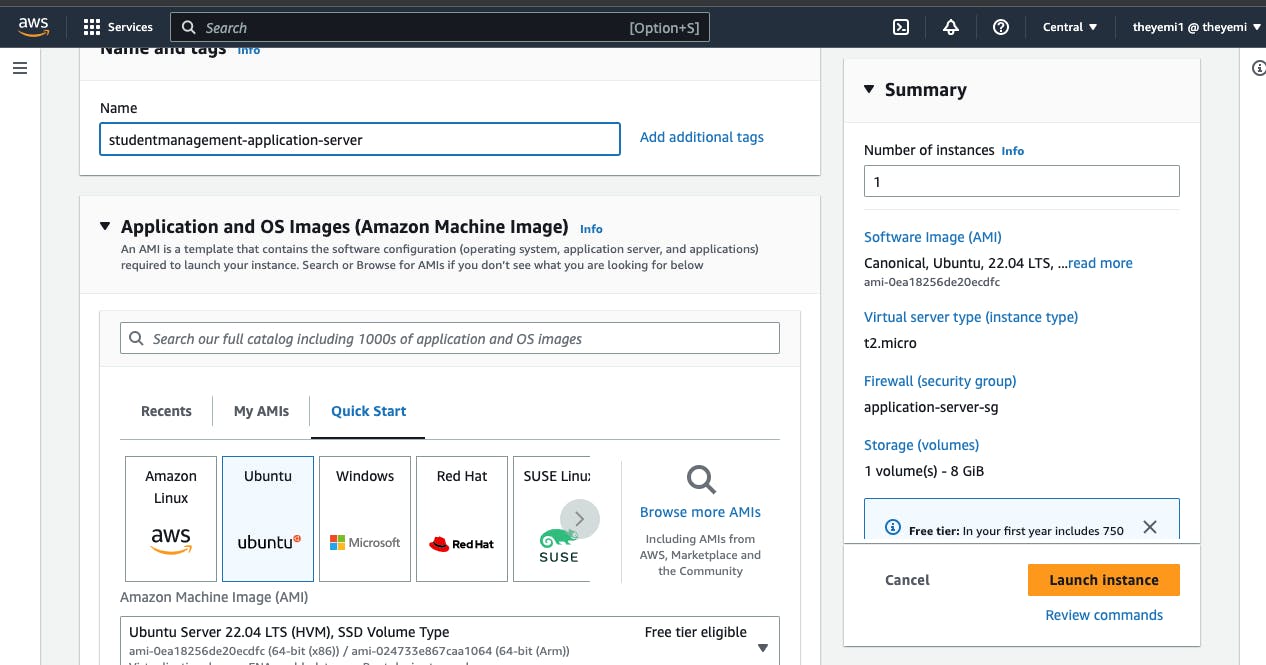
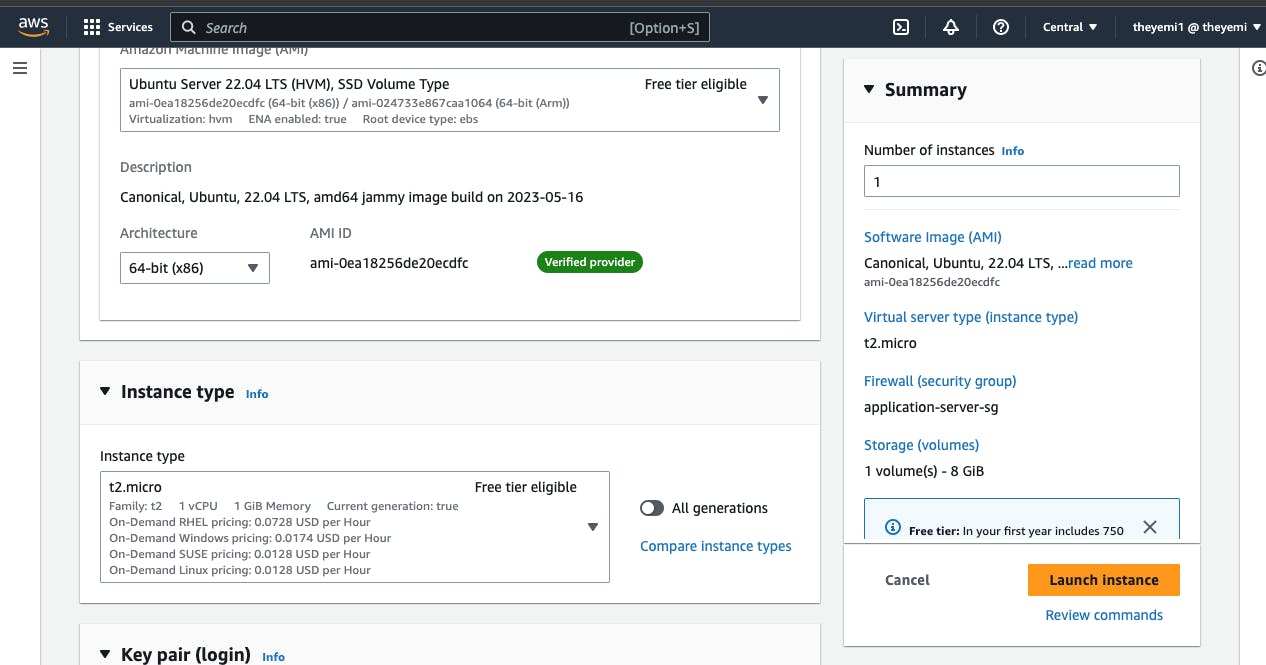
To create the Ec2 instance, on the left hand side, click on Ec2 ---> instances ---> Launch instances
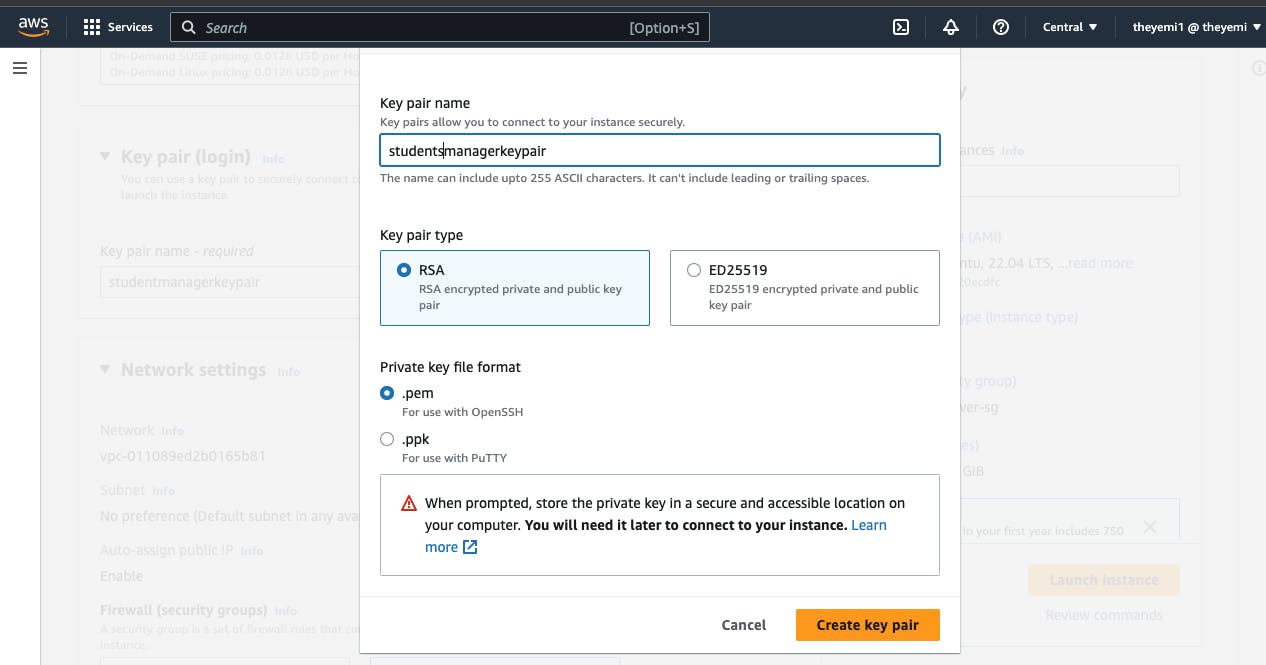
Scroll down to the keypair section and select an existing keypair. if you don't have a key pair, select create new key pair and fill in the details according to the screenshot below. If you are using a Windows os older than Windows 8, select .ppk as the private key file format. When you select Create key pair, the key pair file is downloaded to your local machine.
In network settings, choose select existing group and from the drop-down list, select the application server security group we created previously.
Moving on to the advanced details section, select the label to expand and view more options, scroll down to the end and input this bash script in the user data input box
#!/bin/bash
sudo apt update
sudo apt upgrade -y

# Install Java JDK 17
sudo apt install openjdk-17-jdk -y

wget https://downloads.apache.org/tomcat/tomcat-10/v10.1.9/bin/apache-tomcat-10.1.9.tar.gz
tar -xvf apache-tomcat-10.1.9.tar.gz
sudo mv apache-tomcat-10.1.9 /var/lib/tomcat10

# Create setenv.sh file
sudo tee /var/lib/tomcat10/bin/setenv.sh > /dev/null <<EOF
#!/bin/bash
export JAVA_HOME=/usr/lib/jvm/java-17-openjdk-amd64
EOF
sudo chmod +x /var/lib/tomcat10/bin/setenv.sh
#start tomcat 10
sudo /var/lib/tomcat10/bin/startup.sh
Currently, I'm using JDK version 17 for my spring boot project. You can change the JDK installation command to install your required Java version.
Now launch the instance and wait for a while for the virtual machine's OS to boot up. To confirm that Tomcat is currently installed and running, copy your instance's public ipv4 address and go to this address in your browser window. The Tomcat welcome page should be returned. You can find your ip address by selecting your Ec2 instance in the list of available instances, in the details section your public ipv4 address would be displayed.
http://<applicationec2-publicipv4address>:8080
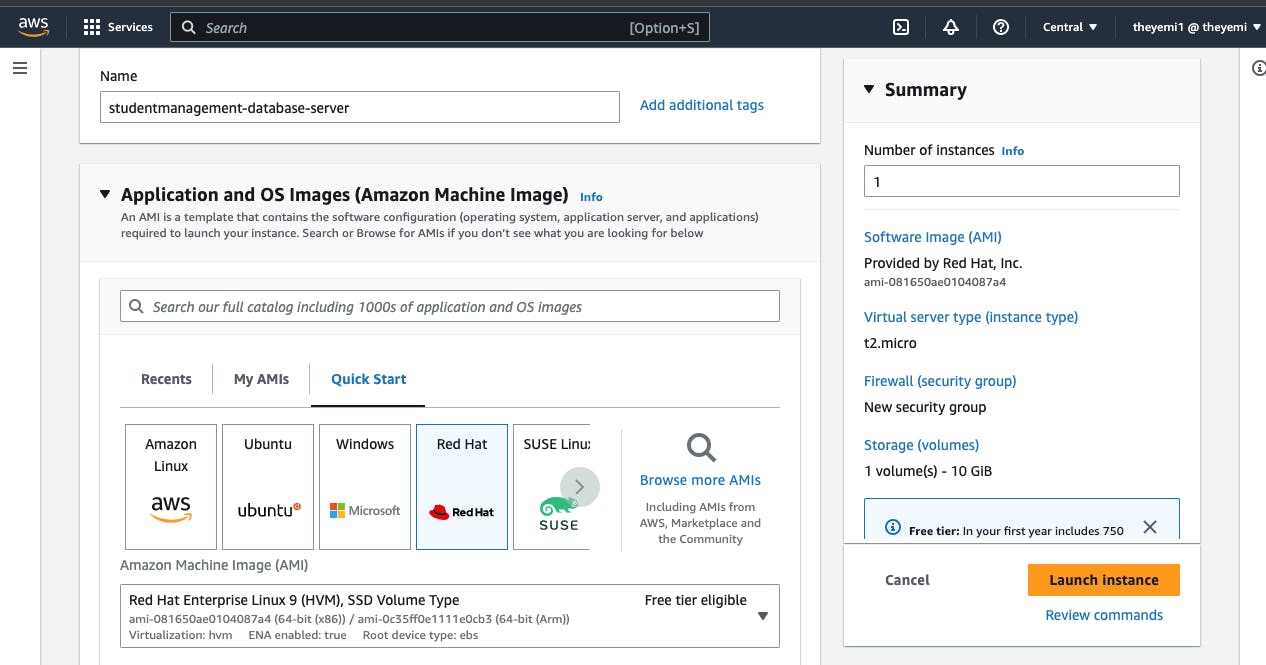

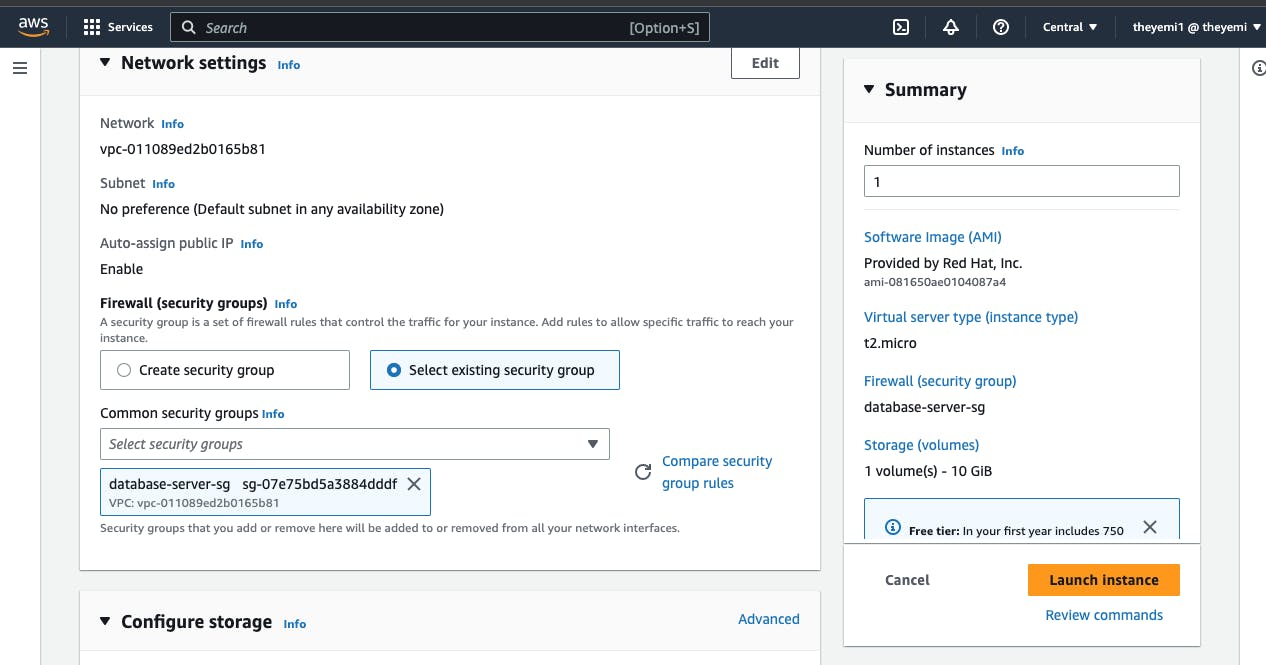
Creating the Ec2 instance for the database server follows the same steps except we won't be creating a new key pair instead we will be selecting the already created key pair. Also, we will be using Redhat Linux as the OS for the virtual machine and selecting the database security group we already created.
You will need to generate a dump file of your table from your Mysql workbench. The following code is what got generated;
-- MySQL dump 10.13  Distrib 8.0.30, for macos12 (x86_64)
--
-- Host: localhost    Database: studentmanager
-- ------------------------------------------------------
-- Server version    8.0.32

/*!40101 SET @OLD_CHARACTER_SET_CLIENT=@@CHARACTER_SET_CLIENT */;
/*!40101 SET @OLD_CHARACTER_SET_RESULTS=@@CHARACTER_SET_RESULTS */;
/*!40101 SET @OLD_COLLATION_CONNECTION=@@COLLATION_CONNECTION */;
/*!50503 SET NAMES utf8mb4 */;
/*!40103 SET @OLD_TIME_ZONE=@@TIME_ZONE */;
/*!40103 SET TIME_ZONE='+00:00' */;
/*!40014 SET @OLD_UNIQUE_CHECKS=@@UNIQUE_CHECKS, UNIQUE_CHECKS=0 */;
/*!40014 SET @OLD_FOREIGN_KEY_CHECKS=@@FOREIGN_KEY_CHECKS, FOREIGN_KEY_CHECKS=0 */;
/*!40101 SET @OLD_SQL_MODE=@@SQL_MODE, SQL_MODE='NO_AUTO_VALUE_ON_ZERO' */;
/*!40111 SET @OLD_SQL_NOTES=@@SQL_NOTES, SQL_NOTES=0 */;

--
-- Table structure for table `students`
--

DROP TABLE IF EXISTS `students`;
/*!40101 SET @saved_cs_client     = @@character_set_client */;
/*!50503 SET character_set_client = utf8mb4 */;
CREATE TABLE `students` (
  `id` int NOT NULL AUTO_INCREMENT,
  `studentnumber` varchar(100) NOT NULL,
  `department` varchar(100) NOT NULL,
  `fullname` varchar(100) NOT NULL,
  PRIMARY KEY (`id`)
) ENGINE=InnoDB AUTO_INCREMENT=6 DEFAULT CHARSET=utf8mb4 COLLATE=utf8mb4_0900_ai_ci;
/*!40101 SET character_set_client = @saved_cs_client */;

--
-- Dumping data for table `students`
--

LOCK TABLES `students` WRITE;
/*!40000 ALTER TABLE `students` DISABLE KEYS */;
INSERT INTO `students` VALUES (1,'CSC 1210','Computer Science','Omosetan Omorele'),(3,'CSC 1260','Business Analytics','Hilson Raymond'),(4,'CSC 1128','Arts','John Doefenin'),(5,'CSC 2228','Arts','Romano wang');
/*!40000 ALTER TABLE `students` ENABLE KEYS */;
UNLOCK TABLES;
/*!40103 SET TIME_ZONE=@OLD_TIME_ZONE */;

/*!40101 SET SQL_MODE=@OLD_SQL_MODE */;
/*!40014 SET FOREIGN_KEY_CHECKS=@OLD_FOREIGN_KEY_CHECKS */;
/*!40014 SET UNIQUE_CHECKS=@OLD_UNIQUE_CHECKS */;
/*!40101 SET CHARACTER_SET_CLIENT=@OLD_CHARACTER_SET_CLIENT */;
/*!40101 SET CHARACTER_SET_RESULTS=@OLD_CHARACTER_SET_RESULTS */;
/*!40101 SET COLLATION_CONNECTION=@OLD_COLLATION_CONNECTION */;
/*!40111 SET SQL_NOTES=@OLD_SQL_NOTES */;

-- Dump completed on 2023-05-31 11:50:38
Now the project's folder structure changes as we will create a new file in the resources folder and add the sql code
In your user data in the database Ec2 instance creation window, enter the following bash script to set up mysql and clone your project repository.
#!/bin/bash
DATABASE_PASS='password280'
sudo yum update -y
sudo yum install epel-release -y
sudo yum install git zip unzip -y
sudo yum install mariadb-server -y

# starting & enabling mariadb-server
sudo systemctl start mariadb
sudo systemctl enable mariadb
cd /tmp/
# clone your github repo
git clone https://github.com/The-indigo/ec2studentmanager.git
#restore the dump file for the application
sudo mysqladmin -u root password "$DATABASE_PASS"
sudo mysql -u root -p"$DATABASE_PASS" -e "UPDATE mysql.user SET Password=PASSWORD('$DATABASE_PASS') WHERE User='root'"
sudo mysql -u root -p"$DATABASE_PASS" -e "DELETE FROM mysql.user WHERE User='root' AND Host NOT IN ('localhost', '127.0.0.1', '::1')"
sudo mysql -u root -p"$DATABASE_PASS" -e "DELETE FROM mysql.user WHERE User=''"
sudo mysql -u root -p"$DATABASE_PASS" -e "DELETE FROM mysql.db WHERE Db='test' OR Db='test\_%'"
sudo mysql -u root -p"$DATABASE_PASS" -e "FLUSH PRIVILEGES"
sudo mysql -u root -p"$DATABASE_PASS" -e "create database studentmanager"
sudo mysql -u root -p"$DATABASE_PASS" -e "grant all privileges on studentmanager.* TO 'admin'@'localhost' identified by 'password280''"
sudo mysql -u root -p"$DATABASE_PASS" -e "grant all privileges on studentmanager.* TO 'admin'@'%' identified by 'password280'"
sudo mysql -u root -p"$DATABASE_PASS" studentmanager < /tmp/ec2studentmanager/src/main/resources/db_backup.sql
sudo mysql -u root -p"$DATABASE_PASS" -e "FLUSH PRIVILEGES"

# Restart mariadb-server
sudo systemctl restart mariadb


#starting the firewall and allowing the mariadb to access from port no. 3306
sudo systemctl start firewalld
sudo systemctl enable firewalld
sudo firewall-cmd --get-active-zones
sudo firewall-cmd --zone=public --add-port=3306/tcp --permanent
sudo firewall-cmd --reload
sudo systemctl restart mariadb
This bash script runs the first time the instance is created. In this line /tmp/ec2studentmanager/src/main/resources/db_backup.sql, ensure you replace "ec2studentmanager" with your github repo name. Launch the instance and wait a moment while the bash script runs in the background.
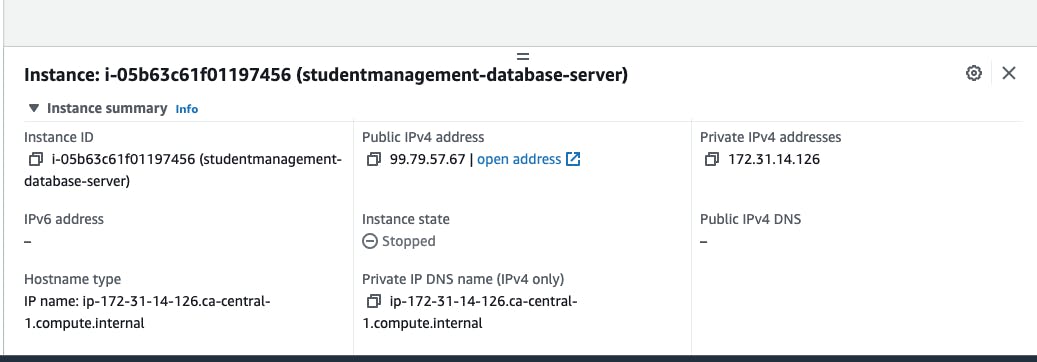
To confirm if the database is up and running, let's ssh into the database Ec2 instance. select the database instance in your list of Ec2 instances. copy the public ipv4 address
open your terminal and enter the following commands
ssh -i path-to-your-downloadedkepair ec2-user@ipv4address
I have my key pair in my downloads directory, I will input
ssh -i downloads/studentsmanagerkeypair.pem ec2-user@99.79.57.67
There will be a possibility of running into a permission error shown below
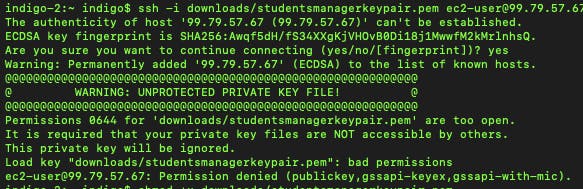
Enter the following command to grant file permission.
chmod 400 path-to-keypair-file
mine would look like this since I have my keypair file in my downloads directory
chmod 400 downloads/studentsmanagerkeypair.pem
Now run the ssh command again: ssh -i path-to-your-downloadedkepair ec2-user@ipv4address
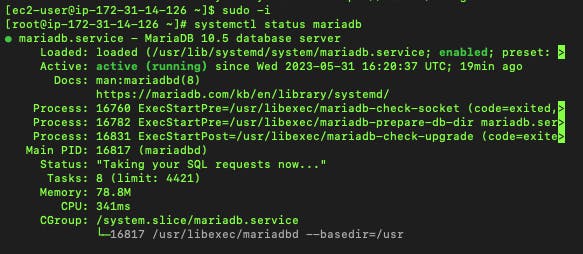
You should be logged in to your database Ec2 instance virtual machine now. Enter the following commands
sudo -i
systemctl status mariadb
"sudo -i" command switches the current user to the super user (root). "systemctl status" command checks to see if mysql is currently running. The output would give a status of "active" if the service is running
Enter the following commands to access your Mysql database
mysql -u root -p
show databases;
use studentmanager;
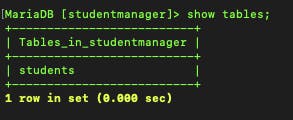
show tables;
.
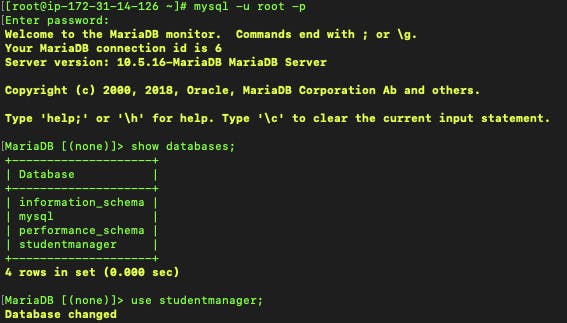
Everything works and we can exit. On your keyboard hold the ctrl+c key to exit the MySQL database server.
We will be creating a DNS record in Route 53 hosted zone for our database instance. This hosted zone in Amazon Route 53 is primarily used for managing DNS records and resolving domain names to IP addresses. It is not directly related to managing or configuring a DB instance. This domain name will be set up to connect to our database in the application.properties file data source url
In your console enter Route 53 in the search box
Route 53 ---> hosted zones---> create hosted zones

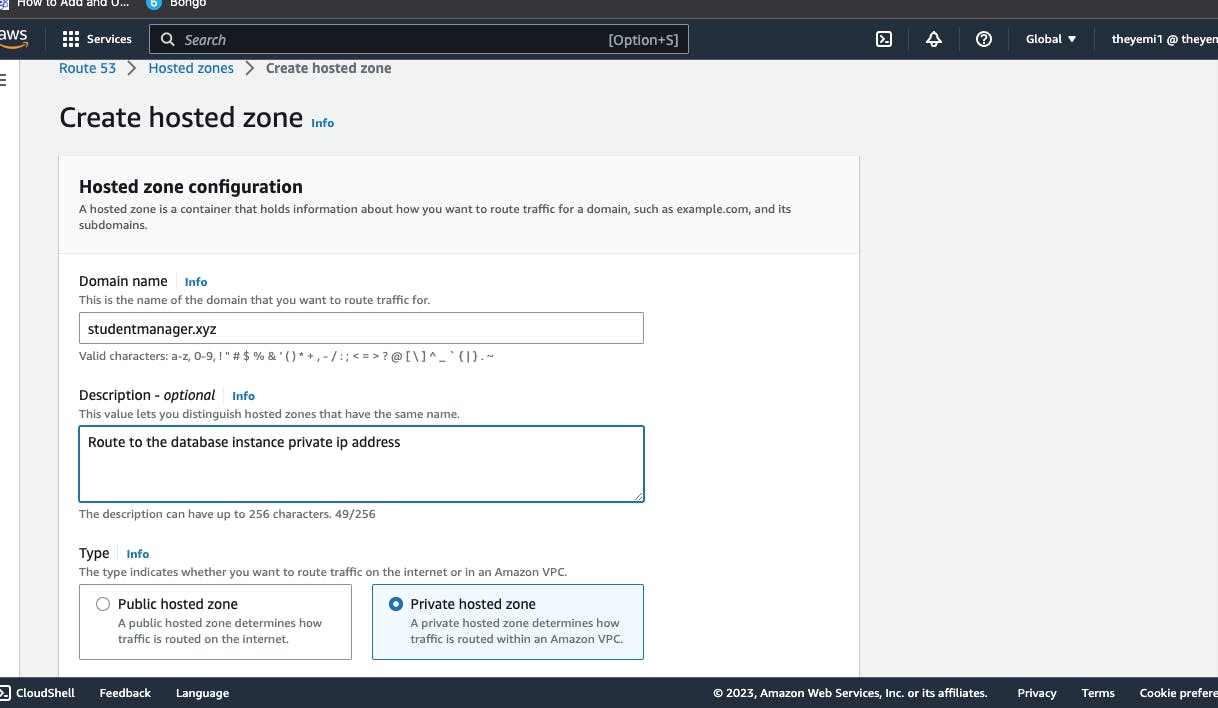
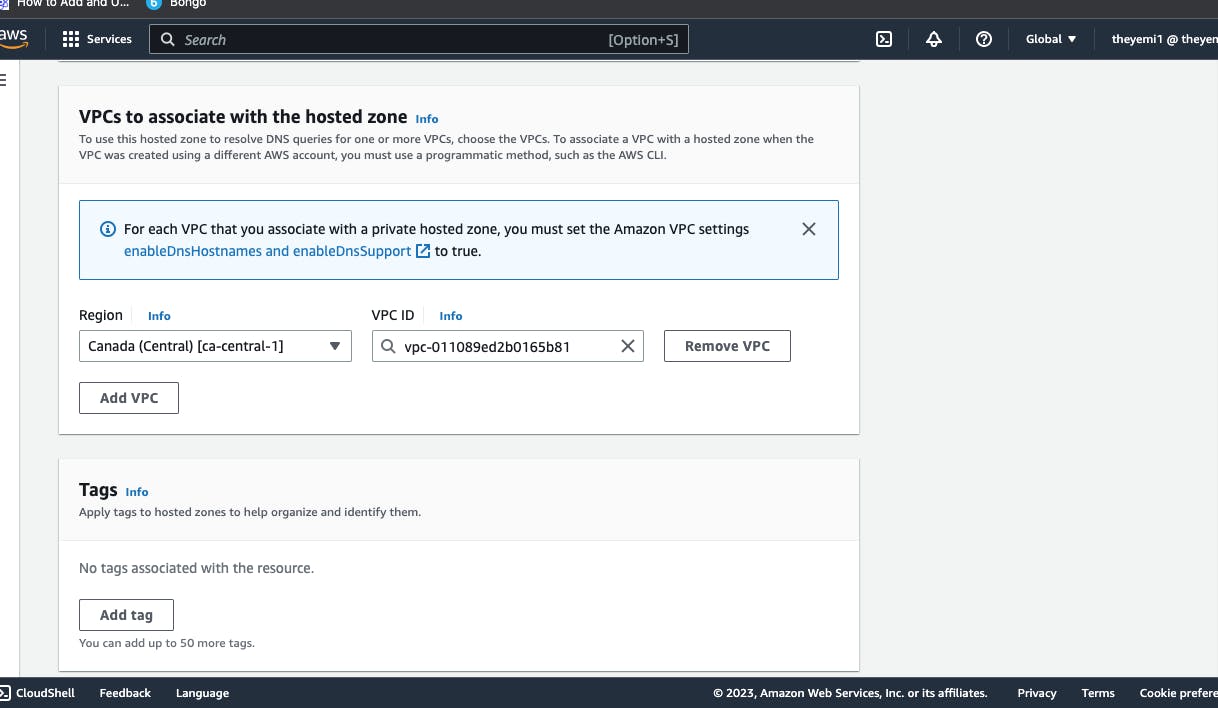
In the region section, ensure you pick the region you created your Ec2 instance. Mine is in the ca-central-1 region. Select the default vpc id in the drop-down and create the hosted zone.
You can find the region your instance is located by going to your Ec2 console window and checking the upper right corner of the screen.
When done with creating hosted zone, click create record

Enter a record name. it could be as simple as db, mysqldb, db01. In the value field, enter the private ipv4 address of your database Ec2 instance. Scroll down and select create records
Our application.properties file now looks like this
#DataSource Configuration
spring.datasource.url=jdbc:mysql://db.studentmanager.xyz:3306/studentmanager
spring.datasource.username=admin
spring.datasource.password=password280
spring.datasource.driver-class-name=com.mysql.cj.jdbc.Driver
spring.jpa.database-platform=org.hibernate.dialect.MySQLDialect
Now we can build the spring boot project to generate the artifact to deploy to Amazon s3 bucket.
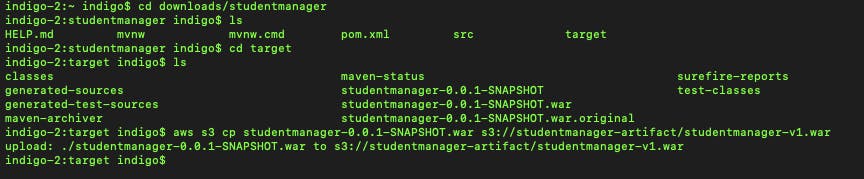
In your terminal, cd into the spring boot project directory. I have my project located in my downloads directory so my command would be
cd downloads/studentmanager
Build the project by running the following command
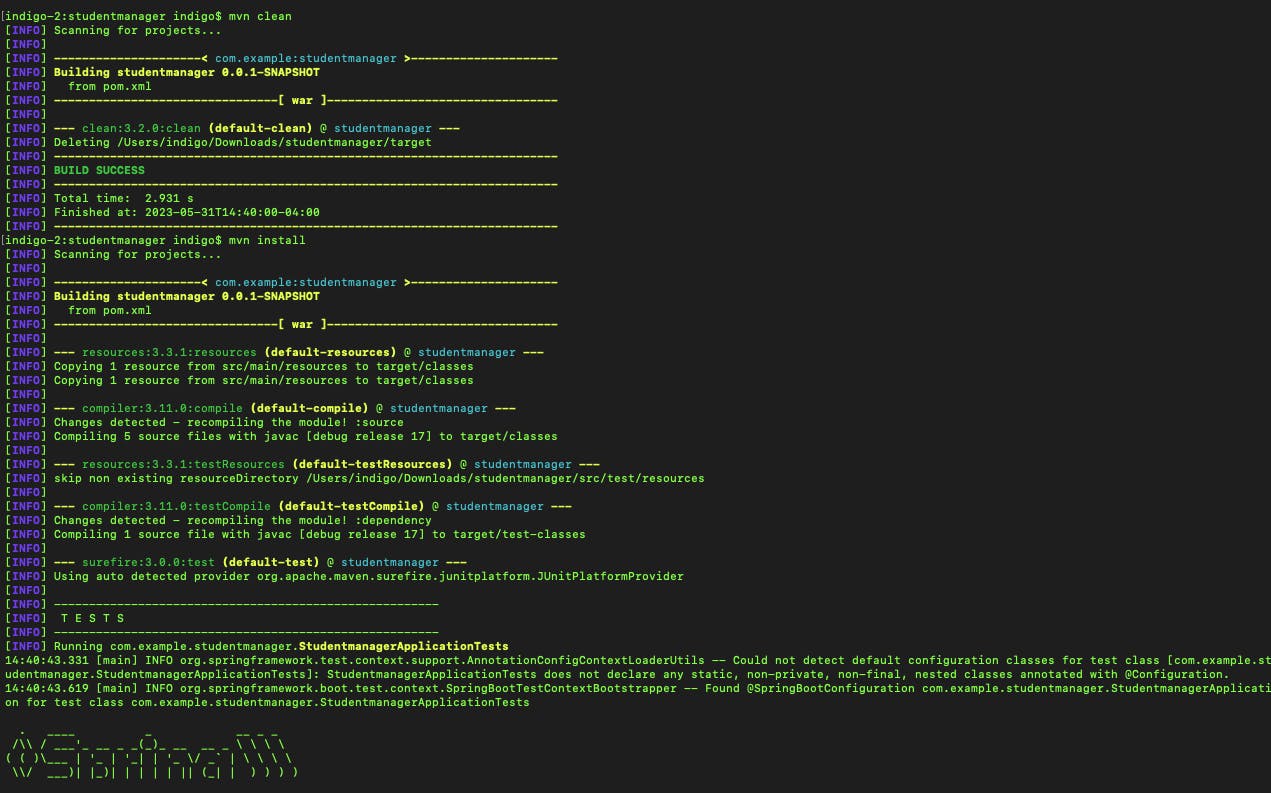
mvn clean
mvn install
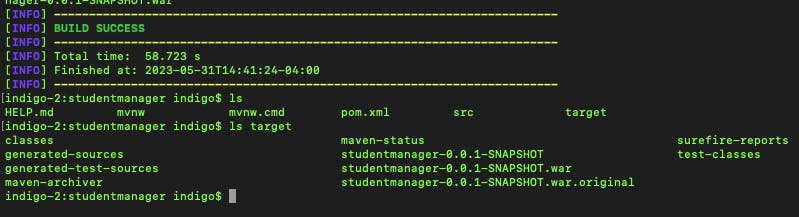
Wait for the project to build successfully. After a successful build, a target folder is generated and you can find your .war artifact file in there. We will be uploading this file to s3 bucket.
We will need our application Ec2 instance to have access to s3 bucket. For this, we will be creating and attaching a user role to the application Ec2 instance to grant full access permission to s3 bucket. This will allow the instance to fetch the .war artifact file we will store in the s3 bucket.
To do this, input IAM in your aws console search box

IAM---> roles-->create role
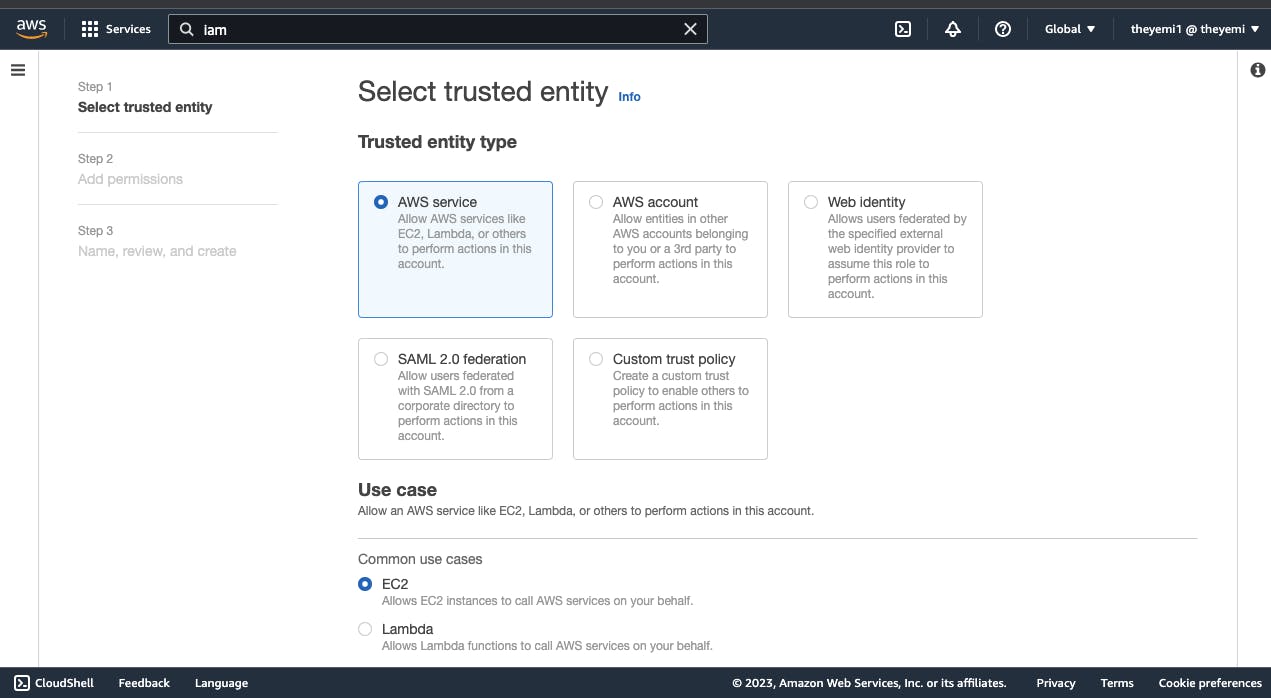
Select Aws service in the trusted entity type section and select Ec2 in the use case section. Click next
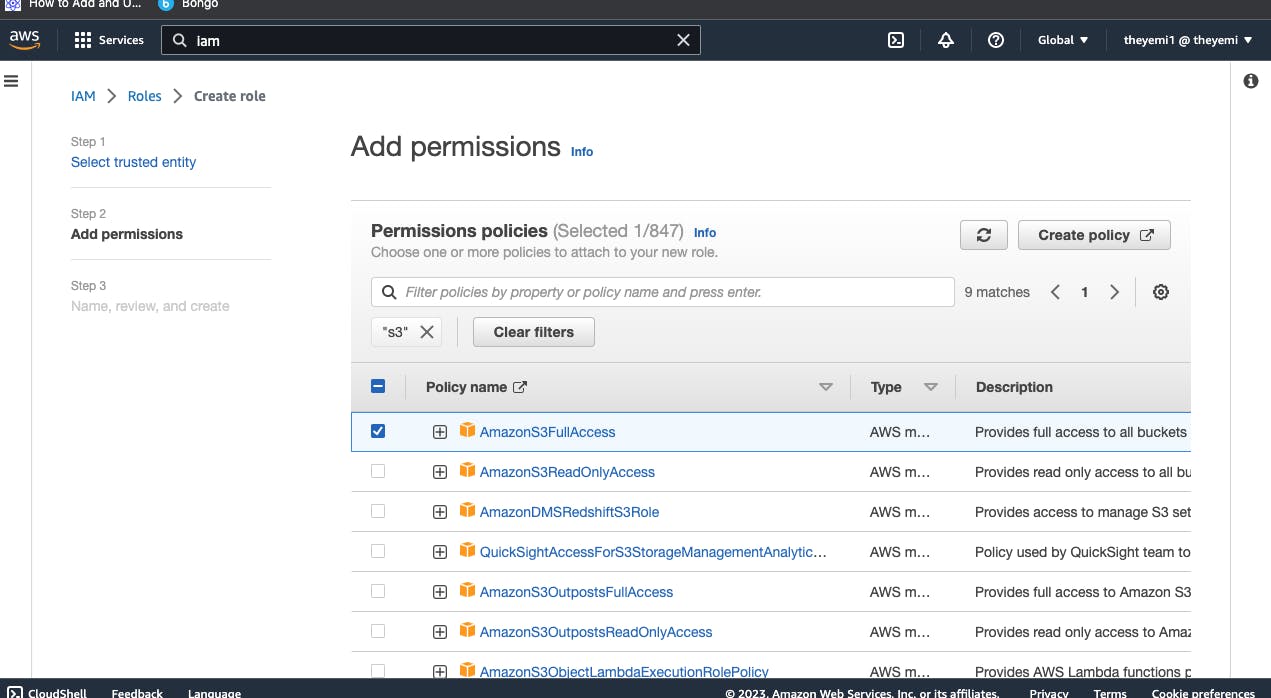
in the search box input s3 and press the enter key on your keyboard. Select AmazonS3FullAccess. Click next
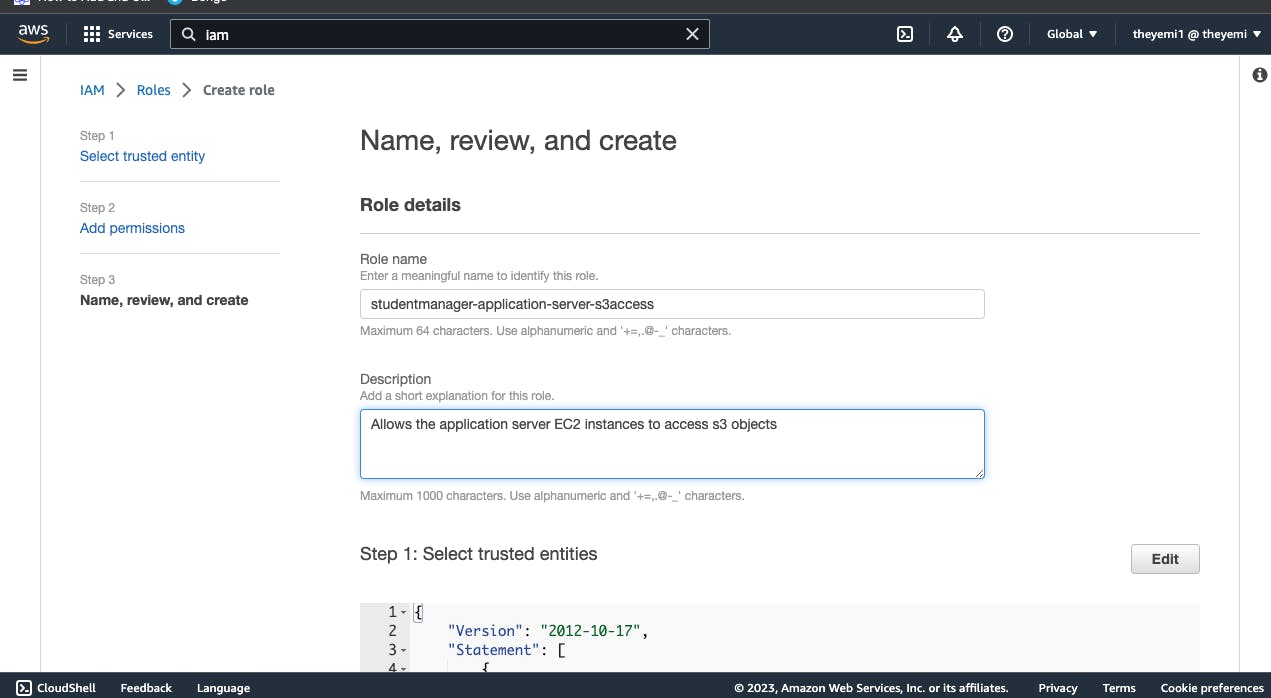
Enter a role name, scroll down and click create role
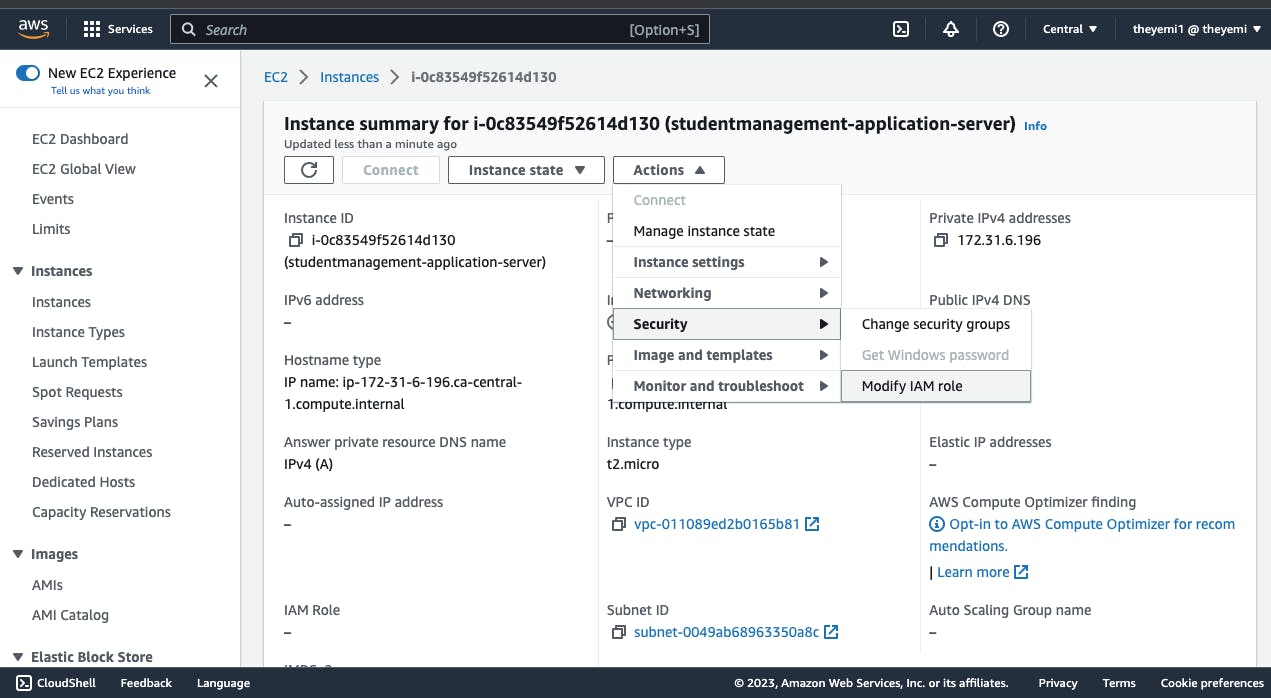
In your Ec2 window, select your application Ec2 instance, click on actions-->security-->modify iam role and select the IAM role created previously from the drop down list. click update role to attach the role to the application Ec2 instance.

Now we can upload the generated artifact into an s3 bucket. There are two ways to go about this, the aws cli using the command line or the graphical user interface using the Aws console. I prefer using the command line. Ensure you have the aws cli installed. To install the cli, run the following command
#mac
brew install awscli
#windows
choco install awscli
#After installing the cli configure your user by running
aws configure
For the s3 bucket creation and file upload, run the below command
#creae a s3 bucket
aws s3 mb s3://{unique-bucket-name}
cd {your-project-folder/target}
#copy generated .war file to s3 bucket
aws s3 cp {generated .war file} s3://{bucketname}/{filename .war}

Now let's ssh into our application Ec2 instance to get the artifact file from s3 bucket. Run the following command
#login to your application Ec2 instance
ssh -i {path-to-your keypair/yourkeypai} ubuntu@{your-applicationEc2ipv4address}
#example
ssh -i downloads/studentsmanagerkeypair.pem ubuntu@3.96.55.20
#go to root user
sudo -i
sudo apt update
#install awscli
sudo apt install awscli -y
#check if the assigned s3 access role is working
aws s3 ls s3://{bucketname}
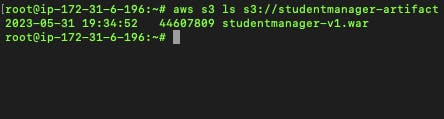
We can see that the assigned role works as it lists the files in the s3 bucket. Now let's copy the artifact into our application server. Run the following command
#copy artifact file into temporary directory
aws s3 cp s3://bucketname/filename /tmp/{filename}
#example
aws s3 cp s3://studentmanager-artifact/studentmanager-v1.war /tmp/studentmanager-v1.war
#stop tomcat service
cd /var/lib/tomcat10/bin
sudo ./shutdown.sh
#cd into tomcat directory
cd /var/lib/tomcat10/webapps
#remove the ROOT folder
rm -rf ROOT
#copy the artifact from the tmp directory into the tomcat10 directory
cp /tmp/studentmanager-v1.war ./ROOT.war
#start tomcat
cd /var/lib/tomcat10/bin
sudo ./startup.sh
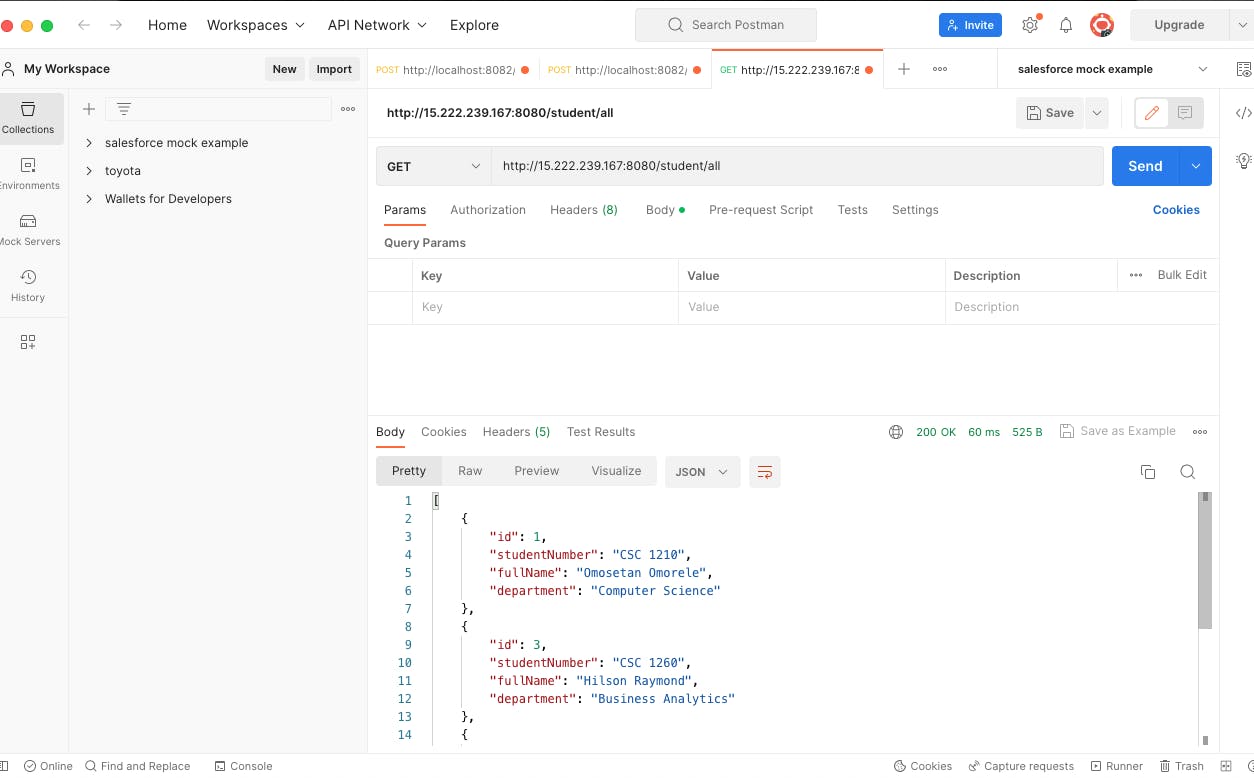
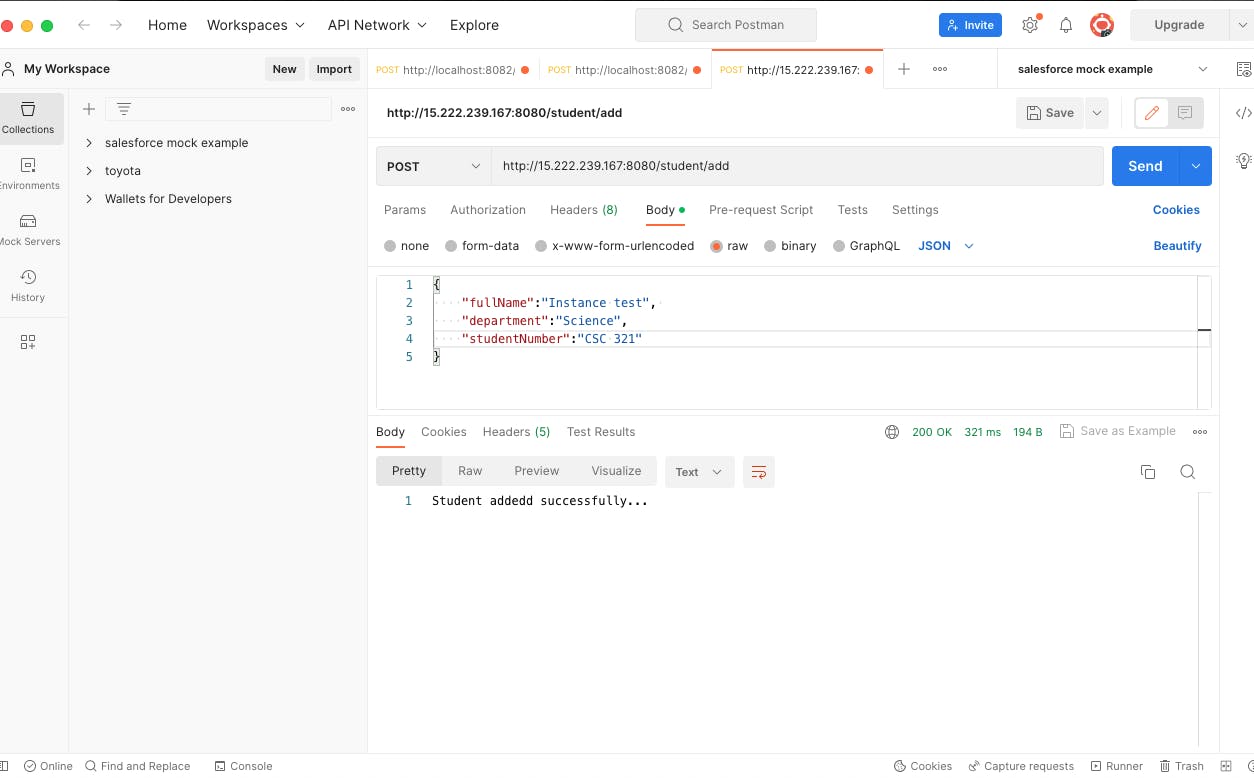
Now our Api is up and running and we can test it with postman using this address;
http://<applicationec2-publicipv4address>:8080 /<your url>
You've reached the end of this article. Everything works!!.
Side note: Your public ipv4 address changes every time you stop and restart your instance but your private ipv4 address remains the same. You can create an elastic ip address to make your ipublic pv4 address static and not change on every instance restart. I would recommend using a hosted DNS (Domain Name System) service but this is outside the scope of this article.